
 April 14, 2017
Facebook is a popular social networking website comparable to MySpace (now social networking function officially defunct). You may receive many invite requests from friends, coursemates, colleagues or family members to join Facebook to connect with them. So you join and sign up a Facebook account but think that may be a phone call is a much better way to bring relationship with friends closer or Facebook account has seriously invaded your privacy and security, you can easily terminate, delete or cancel Facebook account, together with the Facebook profile.

- Sign in to Facebook account.
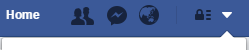
- Click or tap on the Menu arrow on top right corner, and then go to Settings.
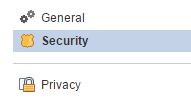
- Click or tap on Security on the left pane.
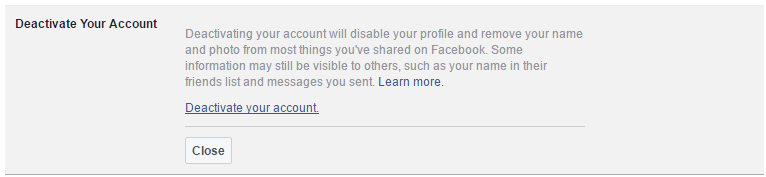
- Click or tap on the Deactivate Your Account (or on the Edit link at the end of the line) to expand the section.

- Click or tap on the Deactivate your accountagain.
- “Deactivate Account” page that asks “are you sure you want to deactivate your account?” will load. Select one of the reasons why you want to delete your Facebook account, such as I don’t feel safe on Facebook, I spend too much time using Facebook, I have another Facebook account, This is temporary. I’ll be back, I need to fix something in my account, I don’t understand how to use Facebook, I get too many emails, invitations, and requests from Facebook, I don’t find Facebook useful or I have a privacy concern, My account was hacke and etc. If you have some special reason on why you want to terminate your Facebook account not listed in the list, click on Other, please explain further and type in your own explanation in the text box provided.
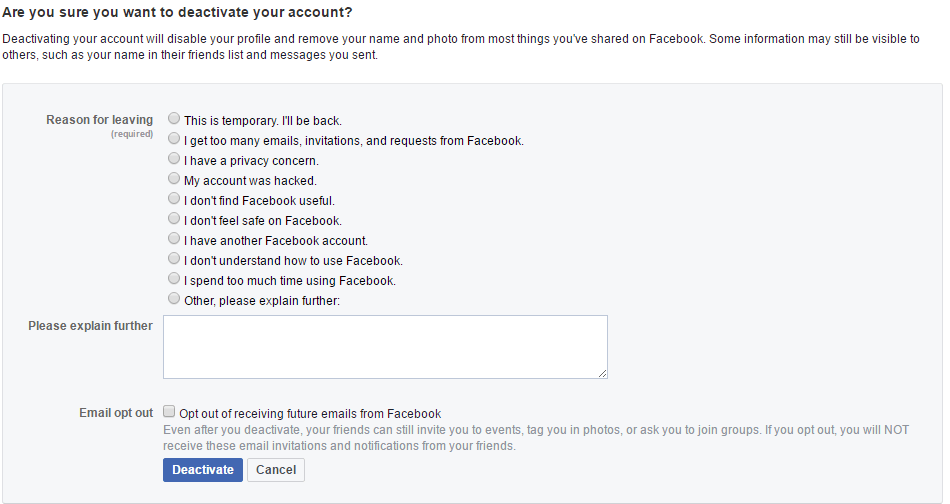
- If you no longer want to receive any invite to events, notification of friend requests, tag in photos, or ask you to join groups from Facebook, click and tick the check box of Opt out of receiving emails from Facebook option to opt out and NOT receive these email invitations and notifications from your friends.
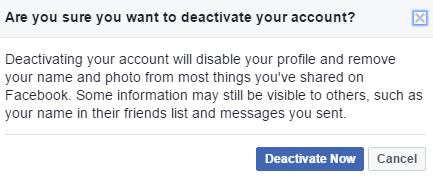
- Click or tap on Deactivate button.
- Hit the Deactivate Now button again on the confirmation pop-up.
- Once the Facebook account is deactivated, the following message will appear:Your account has been deactivated
To reactivate your account, log in using your old login email address and password. You will then be able to use the site as before.We hope you come back soon.
- Now your Facebook account is deactivated, but still can be reactivated. So do not attempt to login with to your Facebook account anymore, as doing so will reactivate your account if you click on the reactivation confirmation link sent to your registered email. According to Facebook Privacy Policy, information associated with your account will be kept until your account is deleted, unless we no longer need the data to provide products and services.
Although can be reactivated and restore your profile in its entirety (friends, photos, interests, etc), deactivation works to completely remove your profile, Timeline and all associated content on your account from Facebook. In addition, users will not be able to search for you or view any of your information.
Facebook account deletion with no recovery option which also ensure that Facebook keeps no data of you is slightly different procedure. Here’s how to delete Facebook account.
The following is legacy method to deactivate Facebook account for previous version of Facebook, kept here for history purpose:
- Sign in to Facebook account.
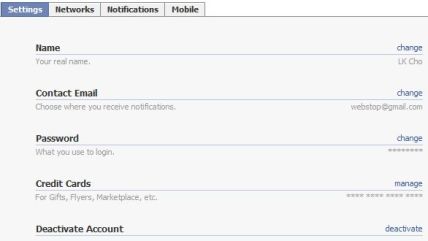
- Click on Account link on the top right corner.

- On the “Settings” tab (click on Settings if you’re not already there), click ondeactivate at the end of “Deactivate Account” line.
- “Confirm Facebook Account Deactivation” page will load. Select one of the reasons why you want to delete your Facebook account, such as I don’t feel safe on the site, I spend too much time using Facebook, I have another Facebook account, This is temporary. I’ll be back, I need to fix something in my account, I don’t understand how to use the site, I receive too many emails from Facebook, I don’t find Facebook useful or Facebook is resulting in social drama for me. If you have some special reason on why you want to terminate your Facebook account not listed in the list, click on Other and type in your own explanation in the text box provided.
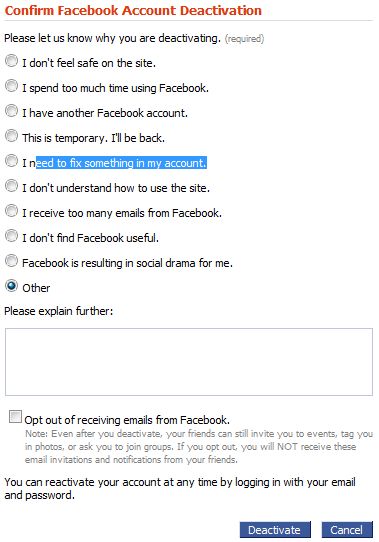
- If you no longer want to receive any invite, notification of friend requests, tag in photos, or ask you to join groups from Facebook, click and tick the check box ofOpt out of receiving emails from Facebook.option to opt out and NOT receive these email invitations and notifications from your friends.
- Click on Deactivate button.
- Once the Facebook account is deactivated, the following message will appear:Your Facebook account has been deactivated.To reactivate your account, simply log in as you normally would, and we’ll send you a reactivation email.Come back soon,
The Facebook Team - Now your Facebook account is deactivated, but still can be reactivated. So do not attempt to login with to your Facebook account anymore, as doing so will reactivate your account if you click on the reactivation confirmation link sent to your registered email. According to Facebook Privacy Policy, removed information may persist in backup copies for a reasonable period of time but will not be generally available to members of Facebook. So probably wait for a few months or years before attempting to login to verify that all your information is cleaned.


No comments
Post a Comment
Hi